 Hyundai Azera: Oil Cooler Repair procedures
Fifth generation HG (2011Ц2025) / Hyundai Azera 2011-2025 Service Manual / Automatic Transaxle System / Hydraulic System / Oil Cooler Repair procedures
Fifth generation HG (2011Ц2025) / Hyundai Azera 2011-2025 Service Manual / Automatic Transaxle System / Hydraulic System / Oil Cooler Repair procedures
| Removal and Installation |
| 1. |
Remove the radiator upper hose and lower hose.
|
| 2. |
Remove the cooling fan assembly.
|
| 3. |
Disconnect the over flow hose.
|
| 4. |
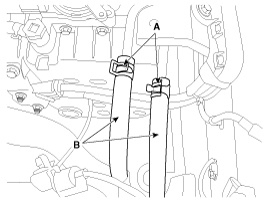
Disconnect the hose (B) after removing the automatic transaxle fluid cooler hose clamp (A).
|
| 5. |
Remove the radiator mounting brackets (A).
|
| 6. |
Separate the condenser from the radiator and then pull radiator (A) up and remove it from engine room.
|
| 7. |
Installation is in the reverse order of removal. |
| 8. |
Fill the radiator with coolant and check for leaks.
|
| Inspection |
Radiator Cap Testing
| 1. |
Remove the radiator cap, wet its seal with engine coolant, and then install it on a pressure tester.
|
| 2. |
Apply a pressure of 93.16 ~ 122.58kpa (0.95 ~ 1.25kg/cm?, 13.51 ~ 17.78psi). |
| 3. |
Check for a drop in pressure. |
| 4. |
If the pressure drops, replace the cap. |
Radiator Leakage Test
| 1. |
Wait until engine is cool, then carefully remove the radiator
cap and fill the radiator with engine coolant, then install it on the
pressure tester. |
| 2. |
Apply a pressure tester to the radiator and apply a pressure of 93.16 ~ 122.58kpa (0.95 ~ 1.25kg/cm?, 13.51 ~ 17.78psi). |
| 3. |
Inspect for engine coolant leaks and a drop in pressure. |
| 4. |
Remove the tester and reinstall the radiator cap.
|
 Oil Cooler Components and Components Location
Components
1. Radiator2. Radiator mounting bracket3. Radiator cap4. Drain plug5. Mounting insulator
...
 Oil Pump Description and Operation
Description
The oil pump is built-in as a single unit with the 26 Brake
chamber. Rotation of the pump builds the hydraulic pressure needed for
the lubrication of the various parts of the transa ...
See also:
Light bulbs
WARNING - Lights
Prior to working on the light, firmly apply the parking brake, ensure that
the ignition switch is changed to the OFF position and turn off the lights to avoid
sudden movement of th ...
CVVT (Continuously Variable Valve Timing) System Description and Operation
Description
Continuous Variable Valve Timing (CVVT) system advances or
retards the valve timing of the intake and exhaust valve in accordance
with the ECM control signal which is calculated by ...
Hazard warning flasher
The hazard warning flasher should be used whenever you find it necessary to stop
the car in a hazardous location. When you must make such an emergency stop, always
pull off the road as far as poss ...
Categories
Hyundai Azera Manuals
© 2011-2025 Copyright www.hgmanual.com


