 Hyundai Azera: Automatic Transaxle Repair procedures
Fifth generation HG (2011–2025) / Hyundai Azera 2011-2025 Service Manual / Automatic Transaxle System / Automatic Transaxle System / Automatic Transaxle Repair procedures
Hyundai Azera: Automatic Transaxle Repair procedures
Fifth generation HG (2011–2025) / Hyundai Azera 2011-2025 Service Manual / Automatic Transaxle System / Automatic Transaxle System / Automatic Transaxle Repair procedures
Fifth generation HG (2011–2025) / Hyundai Azera 2011-2025 Service Manual / Automatic Transaxle System / Automatic Transaxle System / Automatic Transaxle Repair procedures
| Removal |
| 1. |
Engine cover.
|
| 2. |
Air cleaner assembly and air duct.
|
| 3. |
Battery and battery tray.
|
| 4. |
Remove the ground line after removing the bolt (A).
|

| 5. |
Dissconnect the solenoid valve connector (A) and inhibitor switch connector (B).
|

| 6. |
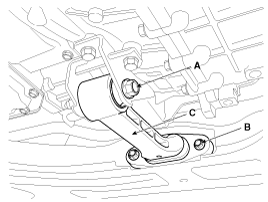
Remove the control cable (B) after removing the nut (C) and the bolt (A).
|

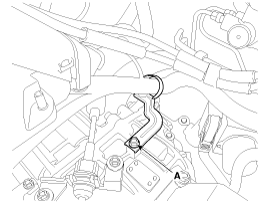
| 7. |
Remove the wiring bracket installation bolt (A).
|
| 8. |
Remove the Crankshaft Position Sensor(CKPS) sensor (A).
|

| 9. |
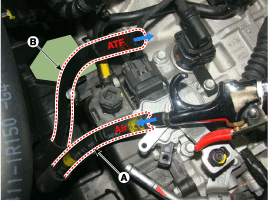
Disconnect the hose (B) after removing the automatic transaxle fluid cooler hose clamp (A).
|
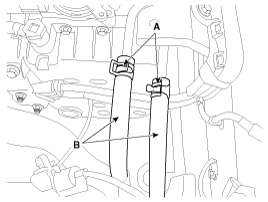
| 10. |
Remove the wiring bracket installation bolt (A) and clip (B).
|

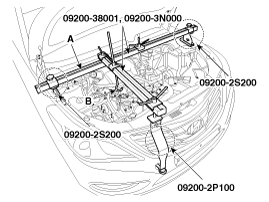
| 11. |
After assembling the T-shaped beam, install the supporter (SST No:09200-2S200) to the beam of SST(09200-38001,09200-3N000). |
| 12. |
Install the adaptor (SST No:09200-2P100) to the beam of (SST No:09200-38001, 09200-3N000). |
| 13. |
Install the assembled SST (A) on the engine room. |
| 14. |
Hang the ring (B) on the engine hanger, support the engine.
|

| 15. |
Remove the automatic transaxle upper mounting bolt (A) and the starter motor mounting bolt (B).
|

| 16. |
Remove the cover (A).
|
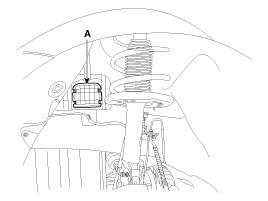
| 17. |
Remove the automatic transaxle support bracket mounting bolt (A).
|

| 18. |
Remove the automatic transaxle mounting support bracket (A).
|

| 19. |
Lift the vehicle with a jack. |
| 20. |
Remove the under cover (A).
|

| 21. |
Drive shaft assembly.
|
| 22. |
Front muffler assembly.
|
| 23. |
Loosen the bolt (A) & nut (B) and then remove the roll rod stopper (C).
|
| 24. |
Remove the dust cover (A).
|

| 25. |
Remove the torque converter mounting bolt (A-6ea) with rotating the crankshaft.
|

| 26. |
Remove the automatic transaxle with a jack after removing the mounting bolt (B-4ea, C-1ea).
|

| 27. |
Remove the start motor mounting bolt (A).
|

| Installation |
| 1. |
Install in the reverse order of removal.
|
| 2. |
In case of the reinstallation.
|

| 3. |
In case of the replacing with a new automatic transaxle.
|

| 4. |
In case of the replacing with a remanufactured automatic transaxle.
|
 Automatic Transaxle Components and Components Location
Components Location
1. Converter housing2. Automatic transaxle case3. Rear cover4. Valve body cover5. Manual control lever6. Air breather hose7. Inhibitor switch8. Solenoid valve connector
...
 Hydraulic System
...
See also:
Parking Brake Pedal Assembly Repair procedures
Removal
1.
Turn ignition switch OFF and disconnect the negative (-) battery cable.
2.
Remove the crash pad lower panel.
(Refer to Body - "Crash pad lower panel")
3.
Remove the junction b ...
Oil Pump Description and Operation
Description
The oil pump is built-in as a single unit with the 26 Brake
chamber. Rotation of the pump builds the hydraulic pressure needed for
the lubrication of the various parts of the transa ...
Do not neglect the interior
Moisture can collect under the floor mats and carpeting to cause corrosion. Check
under the mats periodically to be sure the carpeting is dry.
Use particular care if you carry fertilizers, cleaning ...
Categories
Hyundai Azera Manuals

© 2011-2025 Copyright www.hgmanual.com